Applications
In the United States, DuraTech Chimney can be used with wood fireplaces, furnaces, boilers, water heaters, ranges, or other residential-type appliances fueled by oil, gas, coal, or wood, that have been tested and listed for use with a UL103 chimney system.
In Canada, DuraTech can be used with oil & gas fired appliances listed for use with a Type A Chimney, in accordance with ULC S604.
Materials and Construction
10"-24" diameter pipe feature .027" 430 stainless steel inner wall and outer wall of .029" galvalume or .027" 430 stainless steel. A Thermal Tech (ceramic refractory) blanket insulation is encased between walls. Stainless steel end rings seal the pipe.
Clearances
2" clearance to combustibles.
Shrouds
UL Listed with DuraVent shroud specifications. Information available online at www.duravent.com or call and request L151.
Diameters
10", 12", 14", 16", 18", 20", 22", and 24".
Listings
c-UL-us Listed to UL 103 and ULC S604.
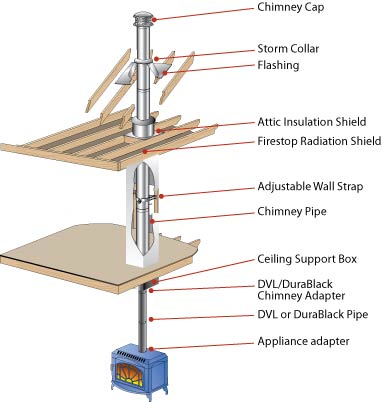
Refer to our Typical Installation drawings to select the appropriate component parts for your installation.
- DVL/DuraBlack Chimney Adapter must be used when connecting DVL pipe to a Ceiling Support Box or Finishing Collar. When connecting DuraBlack pipe, a DVL pipe to a Ceiling Adapter, DuraBlack Slip Connector, or Snap-Lock Adapter must be used.
- Wall Thimble must be installed with an appropriate length of chimney pipe for all horizontal through-the-wall installations. To accommodate thicker walls, the telescoping pieces of the Wall Thimble can be separated, and a field-fabricated extension may be installed.
- Attic Insulation Shield must be used in all installations that pass through an attic, regardless of whether the attic is insulated or not.
- Firestop Radiation Shield must be used when a chimney passes through a floor or ceiling without a support box.
More Typical Installations:
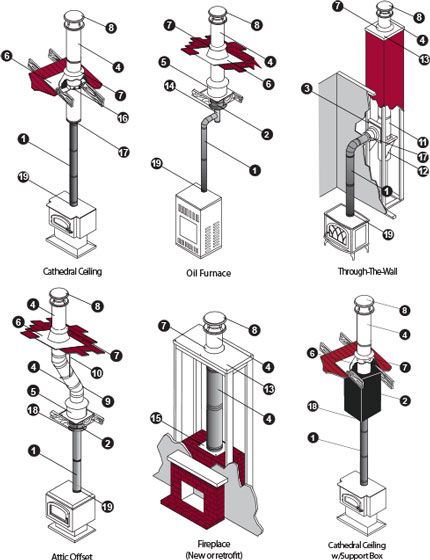
| Installation Key |
| 1 | DVL or DuraBlack |
| 2 | Celling Support |
| 3 | Wall Thimble |
| 4 | Chimney Pipe |
| 5 | Attic Insulation Shield |
| 6 | Flashing |
| 7 | Storm Collar |
| 8 | Chimney Cap |
| 9 | Elbow |
| 10 | Elbow Strap |
| 11 | Tee with Tee Cap |
| 12 | Tee Support |
| 13 | Chase Top Flashing |
| 14 | Base Tee/Double Tee |
| 15 | Anchor Plate or Anchor Plate with Damper |
| 16 | Roof Support |
| 17 | Finishing Collar |
| 18 | DVL Adapter, DuraBlack Slip Connector, or Snap-Lock Adapter |
| 19 | Stove Adapter |
Planning Your Installation:
The following recommendations are general guideline to assist in the layout and selection of the chimney components needed for your installation. Always follow DuraVent Installation instructions before installing your chimney system., found with the cap or support box.
- The diameter of the chimney should match the outlet size of the appliance. An iimproperly sized chimney results in poor draft and excessive creosote formation.
- Measure the diameter of the appliance flue outlet. Select the chimney and either DVL or DuraBlack connector stovepipe with the same size diameter as the appliance flue outlet. For fireplace installations, refer to the sizing chart in the back of this catalog.
- Determine if the installation is a through-the-roof installation or a through-the-wall installation. A through-the-wall installation will require additional components (Wall Thimble, Tee/ Cap, Tee Support, and Wall Straps).
- Install the chimney in the interior of the structure whenever possible. A cold exterior chimney will produce less draft and will generate more creosote.
- If possible avoid offsets that serve to restrict the natural draft. A straight vertical installation is more efficient and less likely to develop creosote. If an offset is required to avoid rafters or other obstructions, measure the horizontal distance required and the vertical height available. Both 15° and 30° elbows are available. Elbows have a 360° swivel base to allow orientation of elbow direction only. Elbows are fixed at 15° or 30°. Elbows greater than 30° are not allowed in the United States. A maximum of two offsets in a single installation are permitted. Refer to the offset table in the back section of this catalog. At least one Elbow Strap is required for each offset. Elbow Straps ensure adequate support.
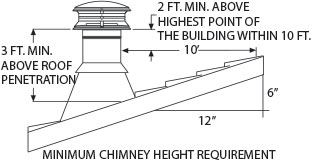
- Determine the minimum chimney height above the roof line. Building codes require a minimum of 3' above the roof penetration and at least 2' higher than any portion of a building within 10'. See figure 1. The termination cap is installed above that point. If chimney extends 5' or more above the roof penetration an extended roof bracket is required. An additional roof bracket is needed every 5'.
- Measure the roof pitch. For example a 6/12 pitch has a vertical rise of 6" over a horizontal distance of 12". Select the appropriate flashing.
- Determine the total length of chimney and stovepipe required for the installation. To calculate the installed per length of 5"-8" DuraTech pipe, subtract 1 ¼" per joint. For 10"-24" diameter, subtract ¾" per joint of pipe. Subtract 1 ¼” per joint of DuraBlack stovepipe. Subtract 1 ½" per joint of DVL stovepipe. Minimum chimney height, at sea level, of straight vertical chimney is 10' to 15' above the appliance outlet. Higher elevations, or the use of elbows or a tee, will require approximately 30% to 60% more height to provide for an adequate draft.
- For a UL approved shroud, see the DuraTech Shrouds Installation Instructions (L157). View online at www.duravent.com, under catalogs and instructions.
- Be fire safe. Maintain at least 2" clearance to combustibles. Follow local building codes and have your chimney inspected by a certified professional.
Catalogs:
Installation Instructions:
Sales Sheets:
Bulletins: